Sunday, 25 October 2015

Continuing Diorama - 2

So after a brief trip away for work, it was back to work on the diorama.  
- Tracks rumbling through Sturminster
The final batch of decals have arrived while I was away , so now all three tanks, the Scammell and the Bofor’s are correctly marked for the 7th Armoured Division.
- Positioned
They have received a coat of dullcoat and now just need some weathering.  And the barrel needs to be fitted to the Churchill!
- Wheres the grass?
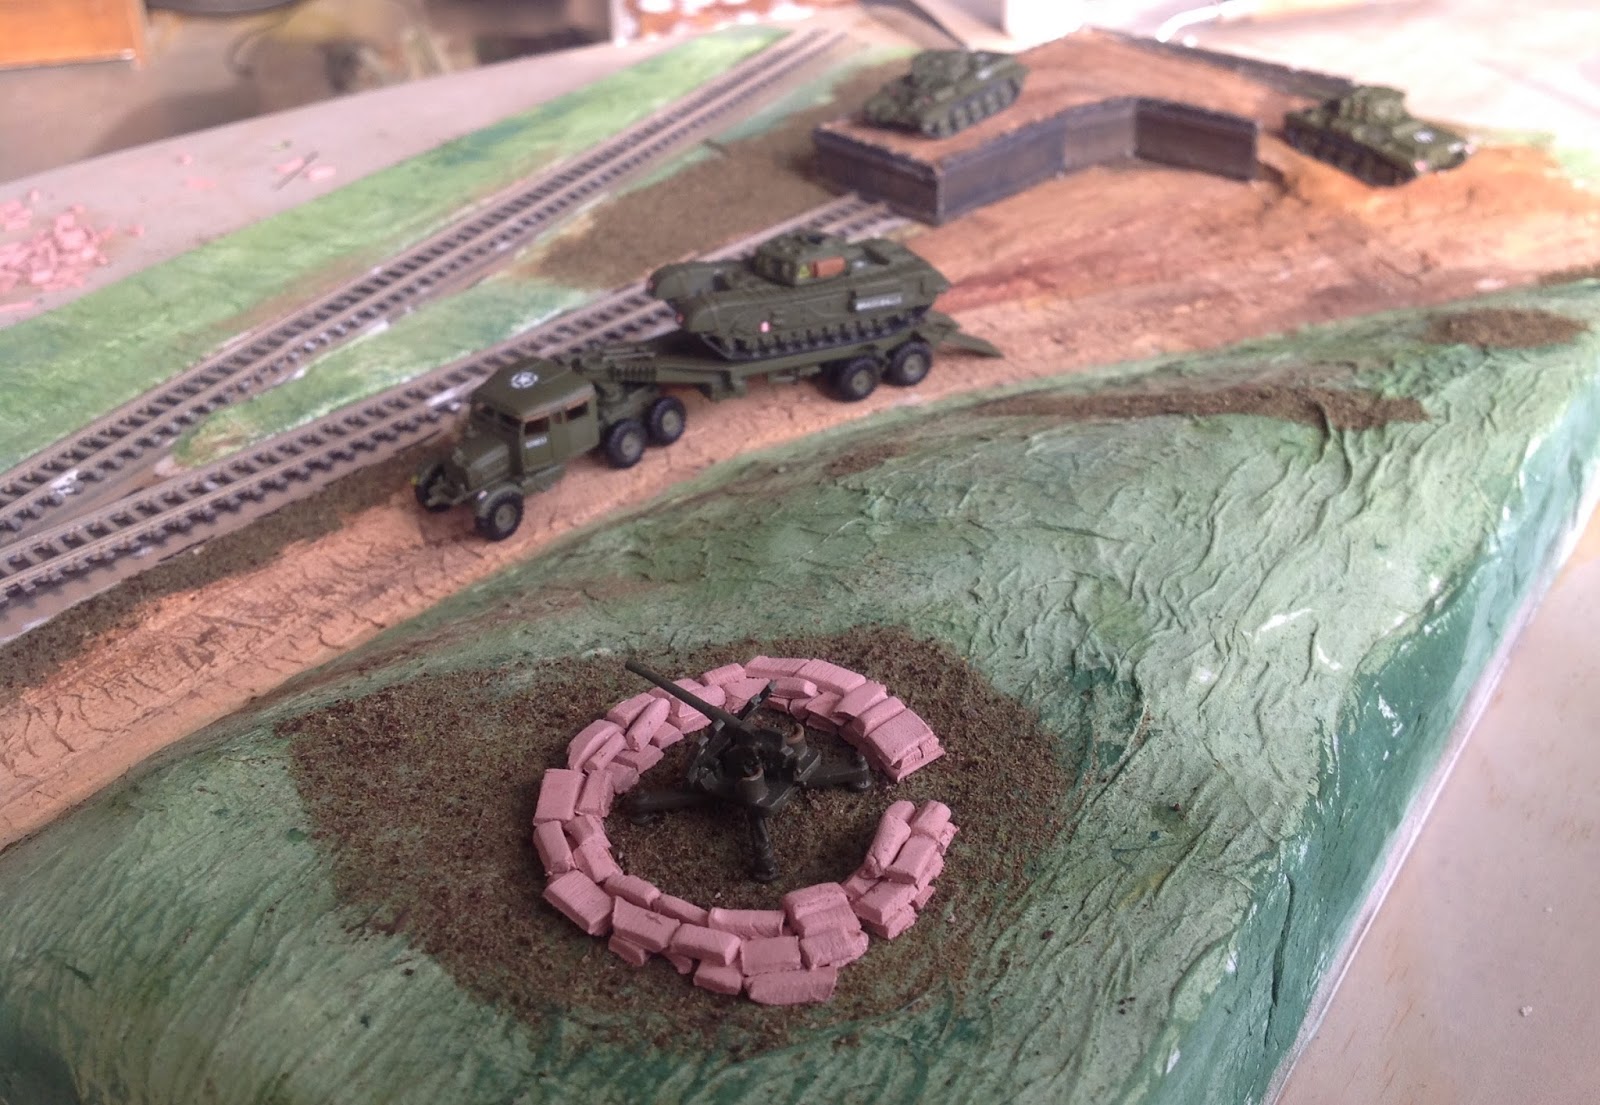
Back to the diorama board itself, it was a matter of building up some layers of base textures and then commence adding the scenic materials.  First up was the ground texture, especially around the ramp area and the Bofor’s gun position.  Next will be some static grass and finally the ballasting of the track.

- Wagons please
Researching some picture of anti-aircraft positions, the guns had some form of protection.  In most cases, the humble sand-bag.  So sand-bag making commenced.  These are just strips of air-dried clay, cut to shape and then glued into position.  Once dry they will get painted a nice shade of hessian/dirt. 
- Sandbag production.
At some stage, I will need to get on with finishing the wagons.

Sunday, 4 October 2015

Diorama continuing

Work continues in the diorama and some other new projects.
- Ready for scenicing
Whilst looking for the hot glue for Mrs Noswal, I came across a ½ open roll of medical plaster bandage, so I was able to finish of the surface texturing.  Once the plaster was laid I applied some randomly cut-up sheets of tissue paper.  This was then run-over by an old matchbox ½-track, which left some suitable wheels ruts.  This was followed by a base colour of paint, and left to dry

- Time for weathering

I’m quite happy with the Scammell, and now just need to weather it.  I’m still a bit undecided as to whether I will deploy the 40mm Bofors on the high ground, that will have to wait and see.

- To keep or lose the Bofors?

On new project front, I came across some S&DJR 5 plank wagons bodies on Shapeways.  They are in 2mm (1/152) and will suit me fine and add bit more variety to the rolling stock at Sturminster.  They printed quite well and just need a through clean-up.  They require a 2FS chassis, which can be knocked-up fairly quickly.

- Nice little rake


Meanwhile, junior modeller turned the big 1 on Saturday.  Take note of her reading material!
- Yes, it hurts when she runs over your toes!

Sunday, 27 September 2015

Catch-up - Lamps and diorama challenge


When I started this blog, I did state there would be delays and gaps, this has been one of them.

- Scratch built with the original
Work on the layout has been minimal since attending the Toowoomba show.  Admittedly it was a bit of a rush to get it to the stage it was to exhibit.  Over the course of the exhibition, we were looking at some pics of the station at Sturminster and comment was made on the uniqueness of the swan-neck lamps on the platforms.  As a part of the prep to get it ready, I had just used some Langley whitemetal lamp posts, which do the job, but are not representative of the genuine thing.  After some brain storming, and some test and evaluation, a design was found, comprising a paperclip, a sequin, a glass bead and several diameters of tubbing.  A satisfactory result. 


At the end of last year, our local N gauge/2mm FS group was set a diorama challenge.  While the rules were thrashed about, it basically boiled down to building a N/2mm scale diorama, based on UK prototype, a minimum of one wagon and a length of track (60’) and it is to fit inside a standard archive box.  Challenge accepted.


I’d recently come across a new supplier of scale WW2 military vehicles, Arrowhead Miniatures.  In particular I liked the Scammell tank transporter, and the diorama challenge gave me the reason to get one.  
- Scammell, unbuilt

- Scammell, built
As with any new project, I leapt into it over the Christmas period, gathering additional pieces of equipment and find other spares within my horde.  By late Feb a firm plan was locked in, but then the impending deadline of the Toowoomba exhibition at the end of May was approaching, so diorama work was paused.  I’ve only now, this weekend gone gotten back into it.
 - posing the vehicles
- Landscaping begins
The archive box measures 30 x 38 cm, which really is plenty of room.  I’ve cut a piece of MDF to fit within the box, and then sealed it.  From there I’ve laid some track and spent most of today shaping some foam to provide some terrain and then used the last of my medical plaster (so much better than the stuff you get from hobby/art-craft/discounts stores – and cheaper)

Sunday, 31 May 2015

Sturminster - Toowoomba Model TrainShow


Well, the 1st exhibition is done and dusted.  A 300km round trip, 2 compete days of running, good friends, great atmosphere and some cleansing ales.  Was it worth it?  Of course it was.

 - The layouts joined, over 10m of frontage
I won’t say it was a panic to get it finished, but as the deadline for departure approach, more and more of the minor things were not crossed off the list.  These can now be competed at a more leisurely manner.
 - Stur frontage
A majority of the feedback was very positive with many wanting info on the techniques used and type of materials and products used.  What little negativity I did get was either about the layout height, 1.2m to baseboard, of that the station and yards were hidden by the trees.  I’m sorry if your child can’t see, but you’ve got tow arms, pick them up.  It’s my layout, built for my enjoyment and comfort.  As for the foliage, I’m trying to depict a particular place and there are trees there.
 - Looking into the yards
 - More yards
- Away from yards
Running wise, we didn’t stick to a set schedule.  We had a selection over 30 made up trains and they ran as we saw fit.  The odd wagon or three continued to de-rail or uncouple, so it was 3 strikes and they were off!  For locos, my new Black 5’s continue to throw traction tyres.  We discovered this last year, and I was advised to get some bullfrog snot, which I did.  It just that I haven’t applied it yet!
 - Behind the scenes
 - Round the back
Will I do it again?  Most likely, we even got an invitation to attend the Gold Coast exhibition in July (just need to discuss with Mrs Noswal).
 - Raising steam 
 - Busy
- Whoops

Monday, 25 May 2015

Sturminster Newton - 1st Exhibition

Sturminster Newtons debut is only days away.  While never finished, it’s come along away in past couple of months.  After tonite I’m putting a halt to fiddling and scenicing and the next few nights will be cleaning tracks and prepping rolling stock.

 - Market Day
- Now to set the scene


Sunday, 17 May 2015

Sturminster Newton - Landscaping - part 7


So, it’s only two weeks until Sturminster is exhibited for the first time.  So much to do and so little time.  As usual work has again interrupted my modelling time! With a majority of the big ticket items done, it’s now down to all the fiddly bits. 

- Getting there, slowly

The surface within the yards area was always a concern.  All reference photos indicated that the surface was at rail level.  My initial plan was to use clay, but after my experiments with the roads, I was concerned that the large area to be covered will be susceptible to damage during transit.  Some further thought and discussions led to me using some 2mm thick card, cut to fit and ballasted along the edges.  Once in place I gave it a couple of coats Tamiya surface paint. 
- Yards road surface
Fencing has continued, on the down platform, around the creamery, and the station road.  Further trees have been added, with still more required.  Some signals have been added (non-working – sorry to disappoint) and I’m awaiting a visit from a signalling expert to give me some corrections.
 
Construction of the main goods shed and feed store are still underway, so a temporary fix of a ready-to-plonk Lyddle End goods shed and a Ratio timber merchants will be gap filers for the time being.
 
- Night and day
With the weather permitting, I got around to painting the PVC pipe holding the LED lights and also the front fascia.  While I’m happy with the LEDs, I did jump in to  them pretty quickly.  Further research would of told me that a variety of brightness and colours are available.  I tend think that mine are a bit too white.  Now that I’ve painted the tubing, I can see a blue tinge.  A future upgrade may see me replace them with a more “yellowish” shade.

 -  View from Butts Pond

- Stationside


Sunday, 12 April 2015

Sturminster Newton - Landscaping - part 6


Well, one week of work down (admittedly it was only 4 days), and output has certainly dropped off!  I was expecting this, but after the massive progress of the past several months, it is a bit deflating!  This week I’ve managed UFO night, hold the monthly meeting (at short notice) and get in some fencing and gardening.
I decided to use UFO night to work on the layout, in particular fencing.  I initially started the fencing all way back in 2010, using Peco post and rail, mainly due to its accessibility here down under.  I have a limited quantity of etched fencing, but not enough, and the cost of getting it from the UK is a bit prohibitive at present.  Postage is getting out of control.  I was recently going to be charged £12 to send out a 35mm slide!  But let’s not get me started on that ………..
- fencing now on both sides of the mainline
As reported on Sithlords blog, I hosted the April meeting of the SEQ area group meeting for the NGS and 2mm scale association.  While Mrs Noswal tried to outdo herself with the catering, it was a good turnout.  It was great to receive some rewarding observations about Sturminster.  Several of the attendees had not seen the layout for several years so their comments were both pleasing and poignant.  While most of us build layouts for our self-enjoyment, well I know I do at least, it’s great to receive feedback from fellow modellers that is encouraging.
For what remaining time I had left of the weekend, excluding household chores, playing lego and watching my aussie rules team get smashed, I made an attempt on the greenery growing on/in/around the fencing on the down platform.  I had one good colour photo to work from.
- not long before closing, Sturminster in the summer of 65
- my attempt
From there it was the matter of teasing out small clumps to make up the flowers/hedge/ivy/weeds.  I used a variety of products; Mininatur, Noch and some cheap stuff I got from China, via eBay (pink and yellow flowers).  They have been glued with a variety of superglue and diluted PVA.  I just need to let them set and then get the vacuum cleaning in to clean-up.
- from the other end
Plans for this week are unknown, but I think the signal box needs to be finished.  The stairs have been built, the building undercoated and the signal levers painted.